My 3 sisters are throwing a combined birthday party next month. And the theme they chose is Harry Potter.
As my gift to them I am making a bunch of the props and decorations.
So here I will give a , sort of, step-by-step on how i made the various items.
Be warned though, I'm pretty bad at remembering to take photos of my process.
So first of ...
When my mom volunteered me to do the sorting hat, I must admit I was not too pleased. It's a fairly daunting thing to make and even pinterest was not very helpful with suggestions.
So, I pretty much made this up as I went along; but I'm very pleased with the results.
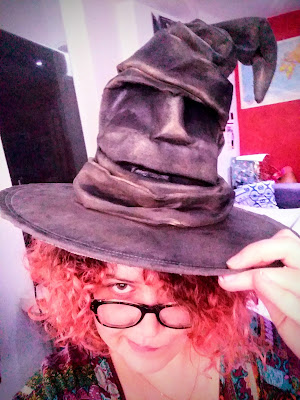
Here is me posing with the final, I have a better image of just the hat at the bottom of this post.

I bought this one for R40 from my local party supply store.
Granted, you could make one. But that seemed way more effort then R40 is worth. SO I went with this guy.
I then sort of mapped out where on the face I wanted the armature to go. The picture is a bit unclear; but I drew on the eyebrows, nose and jaw with chalk.
I must warn you that my hat ended up very much not having this expression; but the armature was very helpful in draping the fabric and keeping it in place.
Then I put this project aside and cowered in fear for 12 hours.
 Ok. I can do this.
I started with a piece of printer paper and sketched out what I thought his brow, nose ridge and mouth plate should look like; then held and curved those pieces on the hat, and trimmed where necessary.
Then I used my paper patterns pieces to cut out the same shapes from a pice of hard plastic. I used a disposable plastic plate.
I wanted to keep the nose completely separate from the mouth piece so I could fold the nose up more and give more of a 3D effect, but in retrospect I realized I should have rather separated the upper and lower jaw by cutting all the way through the mouth-plate.
 I also much later realized that the movie version doesn't really have a nose at all; so you could easily do away with the nose piece all together. But I like that mine is more unique.
I then hot-glued all the pieces into place
 I love hot glue. Really I do. It's great at what it's supposed to do: melt silicone sticks and poor them molten from a nozzle. And depending on your model; you can even get a fair bit of control over the stream of hot goop.
 Draping is definitely the hardest part of this. I had to go twice before I was happy with the result; and I think it may have looked even better if I'd pulled it off again and did a 3rd attempt.
The first time I just slapped the piece of suede against his face and tried to pull it all to the back to get rid of the excess fabric.
I had his sit like that for a few hours before I decided he looked too much like an Easter Island statue and started again.
 This time I went slowly, starting in the deepest part of one eye socket. I pinned the suede to the hat and smoothed the fabric up to the brow, then folded and tucked the fabric away so it created a natural looking ridge. I pinned it to oblivion and did the same for the second eye.
The nose was fairly easy, I smoothed the fabric over, making sure to keep the nose upright; and pinned at the base of the nostrils to preserve the 3D look.
For the mouth I made a big and sloppy box pleat so that he would have lips that gaped open just a little. I pinned this down at the sides of his face and all along the lips.
Where possible, I tucked the lips under the plastic armature so they would be more pronounced.
 Ok, my hat had a face; but still not looking very wizardy.
I cut a pie-slice shaped piece from my suede and sewed into a cone using my sewing machine. You could sew this by hand or hot glue.
Then I cut the now stiff tip of the black hat off a few cm above the eyebrow ridge; and slipped the cone I just made over that cut section.
At this point he looked like he was wearing one of those really old sleeping caps; so I tucked and folded the hat in on itself to give it that wizardy disheveled appearance.
I, of course, pinned as I went along.
Then I sprayed this part of the hat with fabric stiffener as well. I used a piece of printer paper to mask the face as I sprayed the top as I didn't want it to get even darker at this point.
After spraying, I hand-sewed were necessary.
 I cut a new circle from the remaining suede for his brim. I cut a small whole into the centre of this circle and threaded it onto the hat; slowly cutting slits into the sides of my hole to make it bigger as needed.
Then I cut a long rectangular piece from the suede and sewed that together into a long tunnel; then wrapped it under his mouth to hide the seams. I ruffled and shaped this as well; and you guessed it, pin, spray and handsew into place.
PHEW, the sculpting stage of this project is done. It's time for ...
 I filled up a spray bottle with some water and a small amount of fabric paint, then spritzed this mixture all over the hat.
I did 3 layers of this: brown, green and finally blue.
I also used a paint brush to paint the inside of his mouth black.
We're almost there, stay with me.

This sorting hat was such a challenge to make; but I am so happy with the results.
I later also added a phone holder on the inside so we can play recordings of the sorting hat's songs.
If you make a hat based on this one, please send me a pic. I'd love to see it.
Ok, see you in the next post. I've got lots more Harry Potter stuff coming up.
As my gift to them I am making a bunch of the props and decorations.
So here I will give a , sort of, step-by-step on how i made the various items.
Be warned though, I'm pretty bad at remembering to take photos of my process.
So first of ...
THE SORTING HAT
When my mom volunteered me to do the sorting hat, I must admit I was not too pleased. It's a fairly daunting thing to make and even pinterest was not very helpful with suggestions.
So, I pretty much made this up as I went along; but I'm very pleased with the results.
Here is me posing with the final, I have a better image of just the hat at the bottom of this post.

1. ACQUIRE A HAT

I bought this one for R40 from my local party supply store.
Granted, you could make one. But that seemed way more effort then R40 is worth. SO I went with this guy.
I then sort of mapped out where on the face I wanted the armature to go. The picture is a bit unclear; but I drew on the eyebrows, nose and jaw with chalk.
I must warn you that my hat ended up very much not having this expression; but the armature was very helpful in draping the fabric and keeping it in place.
Then I put this project aside and cowered in fear for 12 hours.
2. ARMATURE
 Ok. I can do this.
I started with a piece of printer paper and sketched out what I thought his brow, nose ridge and mouth plate should look like; then held and curved those pieces on the hat, and trimmed where necessary.
Then I used my paper patterns pieces to cut out the same shapes from a pice of hard plastic. I used a disposable plastic plate.
I wanted to keep the nose completely separate from the mouth piece so I could fold the nose up more and give more of a 3D effect, but in retrospect I realized I should have rather separated the upper and lower jaw by cutting all the way through the mouth-plate.
 I also much later realized that the movie version doesn't really have a nose at all; so you could easily do away with the nose piece all together. But I like that mine is more unique.
I then hot-glued all the pieces into place
--------------------------------------------------------------------------------SIDE NOTE
 I love hot glue. Really I do. It's great at what it's supposed to do: melt silicone sticks and poor them molten from a nozzle. And depending on your model; you can even get a fair bit of control over the stream of hot goop.
In this case it was super helpful in attaching the sharp ridges of the brows and nose to the hat as I could basic slather the chalk line in hot glue, sit my piece right in the middle and hold until the hot glue dried; then repeat for all other pieces.
So my hot glue gun has on several occasions been invaluable to me, and I know it is a firm favorite in the DIY community. But I do want to address their downsides for a second.
They leave messy stringy bits all over your project, they leave you with burn wounds, the glue can be very obvious and unsightly when dry and lastly it is not waterproof. Like at all.
Anyway, rant over. Let's continue ...
--------------------------------------------------------------------------------
I put some jacket padding above his eyebrows and under his nose to give them more support; and also into the lower jaw to make the mouth more open..
As I said before, if you make this project, you should just cut the upper and lower jaw apart.
3. DRAPING
 Draping is definitely the hardest part of this. I had to go twice before I was happy with the result; and I think it may have looked even better if I'd pulled it off again and did a 3rd attempt.
The first time I just slapped the piece of suede against his face and tried to pull it all to the back to get rid of the excess fabric.
I had his sit like that for a few hours before I decided he looked too much like an Easter Island statue and started again.
 This time I went slowly, starting in the deepest part of one eye socket. I pinned the suede to the hat and smoothed the fabric up to the brow, then folded and tucked the fabric away so it created a natural looking ridge. I pinned it to oblivion and did the same for the second eye.
The nose was fairly easy, I smoothed the fabric over, making sure to keep the nose upright; and pinned at the base of the nostrils to preserve the 3D look.
For the mouth I made a big and sloppy box pleat so that he would have lips that gaped open just a little. I pinned this down at the sides of his face and all along the lips.
Where possible, I tucked the lips under the plastic armature so they would be more pronounced.
4. FABRIC STIFFENER AND HAND SEWING.
I am terrible at hand sewing, so I preferred to do the fabric stiffener bit first; but you can easily swap these steps.
Also, no photos, sorry.
I sprayed the hat HEAVILY with slightly watered down fabric stiffener. This did make the end result quite a bit darker; but since I wanted to use lots of paint later, that was no problem for me. You will see in the next photo how it created a dark ring on the brim of the hat.
The fabric stiffener only needed about 2 hrs to dry in our hot South African sun. It may take longer in your climate.
When the hat was dry, I used a pair of pliers to pull out the pins. The fabric stiffener made it hard to pull them out by hand. I also tossed out those ruined pins.
If you don't have a ton of pins like me, you should definitely do the hand sewing first.
Once the pins were out I could identify the few spots where the fabric needed some extra help staying in place and carefully tacked those areas down by hand.
5. A HAT WITH A HAT
 Ok, my hat had a face; but still not looking very wizardy.
I cut a pie-slice shaped piece from my suede and sewed into a cone using my sewing machine. You could sew this by hand or hot glue.
Then I cut the now stiff tip of the black hat off a few cm above the eyebrow ridge; and slipped the cone I just made over that cut section.
At this point he looked like he was wearing one of those really old sleeping caps; so I tucked and folded the hat in on itself to give it that wizardy disheveled appearance.
I, of course, pinned as I went along.
Then I sprayed this part of the hat with fabric stiffener as well. I used a piece of printer paper to mask the face as I sprayed the top as I didn't want it to get even darker at this point.
After spraying, I hand-sewed were necessary.
6. AND A SCARF
 I cut a new circle from the remaining suede for his brim. I cut a small whole into the centre of this circle and threaded it onto the hat; slowly cutting slits into the sides of my hole to make it bigger as needed.
Then I cut a long rectangular piece from the suede and sewed that together into a long tunnel; then wrapped it under his mouth to hide the seams. I ruffled and shaped this as well; and you guessed it, pin, spray and handsew into place.
PHEW, the sculpting stage of this project is done. It's time for ...
7. PAINT!
 I filled up a spray bottle with some water and a small amount of fabric paint, then spritzed this mixture all over the hat.
I did 3 layers of this: brown, green and finally blue.
I also used a paint brush to paint the inside of his mouth black.
We're almost there, stay with me.
8. SHADING AND SEALING.
I used a big fluffy brush to shade the insides of his eye sockets. I used charcoal for paint as I had no other black powder.
I also dusted some of this charcoal into the deeper areas of the folds of his "hat" and "scarf"
Then I used a flat brush and some yellow make up powder to highlight the tops of his brow, his nose, his lips and all the ridges and folds on his "hat" and "scarf".
I sealed the paint and shading by misting a thin layer of artist fixative all over the piece.
DONE !!!

I later also added a phone holder on the inside so we can play recordings of the sorting hat's songs.
If you make a hat based on this one, please send me a pic. I'd love to see it.
Ok, see you in the next post. I've got lots more Harry Potter stuff coming up.
Check out the other projects in this collection at:
And I love it, can't wait to hear it sort me into my 'house' ... Pilar
ReplyDelete